
The IMS Bearing Retrofit Procedure

If you own a Boxster or 996, you’ve probably heard of the Porsche IMS bearing issue and probably have already replaced the intermediate shaft bearing. However if you are new to the marque, you might not be familiar with the IMS bearing and how you can replace it as part of preventative maintenance to prevent a catastrophic failure.
Both Flat 6 Innovations and LN Engineering recommend professional installation however if you have tools (including access to some specialized tools), a good mechanical aptitude and the ability to safely remove your gearbox/transmission you can probably do the job yourself. We suggest that you thoroughly research IMS bearing replacement before starting this job so that you have a clear understanding of what you are getting yourself into.
Moving forward with the retrofit we would suggest first running a PIWIS computer interrogation of the car to obtain the camshaft deviation numbers. This can also be accomplished with a Durametric which is a must for any do-it-yourselfer who owns and works on a Boxster or 996. Camshaft deviation is the relationship between the position of the intake camshafts to the crankshaft. The reason to check camshaft deviation is to determine the mechanical accuracy of the camshaft drive. If the deviation is beyond a specific amount from nominal (model dependent) then we know there are other internal problems that are taking place such as a faulty chain adjuster, chain stretch, chain rail wear, sprocket degradation, etcetera and these should be checked out and addressed.

If the engine is a 97–02 Boxster or 99–01 996, if the cam timing deviation exceeds four degrees, the Variocam chain ramps will need to be replaced and camshaft timing reset before you proceed with intermediate shaft bearing replacement. If you have an 03 or later Boxster, 02 or later 996, or 987/997 model with a three chain engine, excessive camshaft timing deviation may indicate stretched timing chains if resetting the cam timing does not correct this. Unfortunately, complete engine disassembly is required if the timing chains need to be replaced on a 3 chain engine as master link timing chains are not offered for the M96 or M97 engine.

Remove the engine oil filter, cut open and inspect the filter material for any debris. If metal debris is found then some actions should take place regarding metal circulating in the engine. Minimally we suggest that you install a magnetic drain plug to help catch metal debris and additionally send a sample of the used engine oil to a lab for analysis testing, but beware that used oil analysis will only catch particles you can’t see with your naked eye, so that is why it is so important to check for debris when servicing your Porsche engine.
Drain engine oil. Additionally you can remove the oil pan to further check for debris. This will also allow you to properly bore scope the cylinders for bore scoring which should be done through the sump. If you have never dropped your engine sump or do not know the condition of your cylinders, this is a good idea to do this, and is part of the ims pre-qualification procedure created by Jake Raby when developing the IMS bearing replacement procedure.

Remove Gearbox/Transmission. The engine remains in the car however the engine must be solidly supported from below near the transmission/gearbox attaching end. If you have a Tiptronic 996 or 997 model, the engine cannot be separated from the transmission in the car, so the whole drivetrain must be dropped as a complete unit before you can service the IMS bearing. This isn’t entirely a bad thing — many shops recommend doing this so that you can more easily service the water pump, AOS, AOS vent tubes, coolant expansion tank, and Variocam chain ramps (only on 5-chain engines), where servicing these items is much more difficult with the engine in the car. Pelican Parts has an excellent write up on how to change worn Variocam chain ramps on 5-chain engines including resetting cam timing on these models.
Remove flex-plate or clutch and flywheel assemblies, inspect for wear or damage as well as other clutch system components such as the operating fork and release bearing. This is a good opportunity to replace any worn components. Replacement of all the flywheel bolts and clutch slave cylinder is recommended.

LuK and several other companies make a tool to check the factory Porsche dual mass flywheel to make sure it is reusable, but in our experience, when putting a new clutch in you are best to also put in a new flywheel, pressure plate, and throwout bearing. The rear case perimeter bolts should also be replaced with new micro-encapsulated bolts if there are signs that any of them have been leaking. You can put Curil T on the underside of the bolt head for added leak protection.
At this point, if you find that your IMS has the larger 22mm nut, that means the engine is not original to the car and was replaced with an engine manufactured in or after the 2006 model year with the non-serviceable 06–08 IMS bearing.
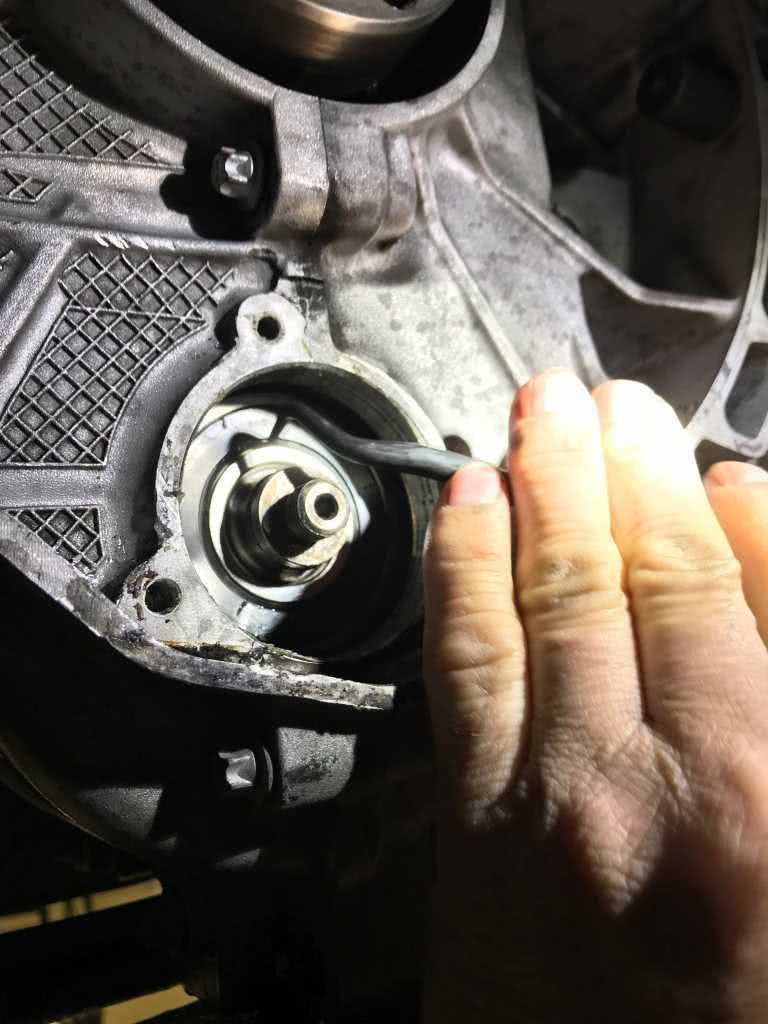
You won’t be able to replace the IMS bearing without complete engine disassembly, however you should still remove the grease seal off of the original bearing to aid in extending the life of the original IMS bearing. You would still follow the same procedure below with exception that you won’t be replacing the bearing in the process. Under no circumstances should you bore out the engine block to allow for extraction of this larger bearing.
Remove all spark plugs and rotate the engine until cylinder number 1 is at Top Dead Center (TDC). It is very important to note that an M96 or M97 engine only be rotated in a clockwise (or operating) direction when looking at the crankshaft pulley. Never turn the engine counter or anti clockwise, not even slightly, as problems with the valve train can result. If you miss cylinder number 1 (TDC) continue turning clockwise until you hit it.

Don’t scope the cylinders for bore scoring through the spark plug hole. Bore scoring must be checked for through the sump with the piston at TDC so you can inspect the bottom of each cylinder, since cylinder bore scoring always starts at the bottom and works its way up. Only if the engine has late stage bore scoring will you find the scoring through the spark plug hole.
When cylinder one is positioned at TDC, pin the crankshaft pulley at this position so the crankshaft cannot turn.
Remove the camshaft end plugs and note to replace with new pieces during reassembly- you will need 4 new plugs. Then install the camshaft jig timing assemblies, to lock the camshafts in their current position. We are concerned about pressure being applied to the camshafts by the valve train which could allow the cams to move when the chain tensioners are removed. The three chain version of the M96 is more likely to experience this problem however we feel the preemptive approach of locking everything in place is better than having to re-time the engine camshafts.

Although the factory procedure does not require you to lock the cams on both banks, with an optional cam lock tool it is possible to lock the opposing cylinder bank on a three-chain engine.

Remove all three chain tensioners. Please note tensioners are location specific. Engine failure will occur if not installed in the correct location. Each tensioner has rings on the end that correspond to casting marks on the head and case, just in case you were not aware of this. Also, if your engine is noisy at cold startup and immediately quiets up after you start it, it is likely chain noise you are hearing from the engine having bad chain tensioners. Thankfully, these are relatively inexpensive and can be replaced while carrying out the IMS bearing replacement procedure. Be sure to replace the crush washer when reinstalling the chain tensioners.
Clean back of engine (bell housing area). This is a good time to replace the crankshaft Rear Main Seal (RMS) with the updated PTFE type seal, even if your current RMS is not leaking. If you decide to install the updated seal do so utilizing only the proper tool for Porsche rear main seal replacement. This tool sets the correct RMS installation depth and is critical to use for a trouble free installation as without proper depth the RMS may come out. The updated rear main seal installation tool also installs the seal at a different depth than the original as you do not want the seal riding on the same spot on the crankshaft as it was previously. Do not touch the inner lip of the seal with your bare fingers because the acid on your hands can deteriorate the seal surface and cause problems.

If you are purchasing your IMS kit from LN Engineering, they offer free IMS tool rental for the Porsche specific tools required to replace the intermediate shaft bearing and rear main seal.
Remove the three bolts holding the IMS bearing flange assembly and the single hex nut in the center of the flange that attaches to the IMS bearing support stud. Although Porsche tool number 00072196730 can be used to remove the IMS flange, a pair of flat-blade screwdrivers can be used to walk the flange off. Even if the engine is at TDC and the chain tensioners are removed, the flange will not come off if the camshaft timing is not correct.

That is why it is critical to check for camshaft timing deviation before starting this job and to correct the cam timing first, otherwise you will run into difficulties at this point. Even if the flange comes off, if the IMS shaft is not centered in the IMS housing bore, you will not be able to re-install the IMS flange.
With the flange removed, if you find that the original bearing has already failed, do not attempt to cut out or otherwise extract the bearing. The engine will need to be disassembled. The most likely model you might encounter a complete failure is 00–05 model years with the serviceable single row bearing.

The easiest way to tell if it is too far gone is if you cannot see the snap ring that retains the single row bearing. If the bearing hasn’t yet catastrophically failed but you find significant ferrous debris, at this point you need to make a decision if you want to proceed with bearing replacement. LN Engineering does not recommend installing any Retrofit bearing if there is debris present in the engine, so your best bet is to install an IMS Solution which includes a spin on oil filter adapter for better filtration. It is also a good idea to fit a FilterMag onto the steel bodied oil filter and also install a magnetic drain plug on the engine to attempt to capture any residual debris that might remain in the engine after the IMS bearing has been serviced. It would also be a good idea to do several oil changes in short succession and also drop the oil pan at the next few oil services to clean any debris that might collect in the sump.
At this point, take care not to allow anything to fall into the engine, as it will not be possible to retrieve it.
If your engine has a single row IMS bearing there will be a visible snap ring in front of the bearing’s outer race, remove the snap ring carefully. If you have a dual row bearing there is an internal retaining wire-loc that will collapse as the bearing is removed, which should be retained by the bearing puller. You must account for all pieces of the internal wire lock used on engines with the factory dual row IMS bearing if it does not come out in one piece.

Thread the hex bar adapter (part of the IMS Pro Tool kit) already attached to the bearing puller onto the IMS support stud by turning the 12mm hex end of the tool clockwise. Make sure the bearing puller is centered over the bearing before beginning the extraction process and lubricate the puller threads before first use. With the extraction tool now solidly connected to the IMS bearing support stud turn the extraction tool’s hex nut clockwise until the extraction tool’s sleeve makes contact with the intermediate shaft (note: at this point the sleeve will be inside the IMS flange opening in the case). Continue turning the hex nut clockwise and the IMS bearing will be pulled into the sleeve. When the IMS bearing is extracted completely both the bearing and the extraction tool can be removed together. If the center stud breaks, which it can if already weakened, you can use the ez-out tool provided in the IMS Pro Tool kit to pull the bearing from the center race. Keep in mind this is the exception, not the norm, but be prepared for the worst. When the IMS bearing is removed engine oil that has been trapped behind the bearing inside the IMS will come out, not a lot of oil but enough to make a mess, be prepared. Clean the area of any residual oil and or any debris before installing the new bearing.
Attention now turns to the new IMS bearing. Remove the center stud nut and the spare o-ring from the bearing. Place the aluminum bearing driver installation tool in position by sliding the tool over the bearing center stud with the counter bored end facing away from the bearing. Install the 12 point ARP nut onto the end of the center stud (visible inside the counter bore), snug up the 12 point nut so that the bearing is attached to the driver installation tool as a single unit. This should be finger tight — do not torque or use any kind of power or impact tool to do this. Please note that depending on which version of the bearing driver you have, it may not be possible to install the nut on the center stud.
To aide in installation, it is possible to put the bearing and driver together in the freezer prior to installation. Also, if there are any signs that the original bearing has been moving in the housing bore, using a Loctite bearing mount or similar product on the outside diameter of the new IMS bearing prior to installation. Take care not to get any bearing mount inside the bearing.
At this point, depending on which IMS bearing replacement is being installed, the installation process will vary. If you are installing a Single Row Pro, the Faultless IMS Tool kit must be used to install the new IMS bearing as you have to deliver the bearing and internal wire lock simultaneously into the intermediate shaft.

If installing an IMS Solution, the supplied IMS plug should be installed using the driver included in the Supplemental IMS Tool kit before you install the new IMS bearing.
For all other bearing types including the dual row IMS Retrofit, RND RS Roller, or IMS Solution, place the bearing up to the IMS taking care to be sure the bearing is straight and contacting the bore inside the IMS evenly. Using a plasticized type dead blow hammer begin to gently tap the end of the driver tool to drive the bearing into the IMS. The IMS will move slightly inwards towards the opposite side of the engine until the shaft rests against the oil pump. Continue to gently tap the driver tool as the bearing will slowly move into the IMS until in place. Then install appropriate spiro-loc for the dual row bearing or snap-ring.
Lubricate the IMS flange seal prior to installation using o-ring grease or a non-hardening sealant like Curil T. Place the flange in position taking care not to damage the seal, if the seal is damaged replace with a new Genuine or OEM triple lip seal. As mentioned previously, if the intermediate shaft is not centered in the opening, forcing the flange will end up cutting the seal and will result in a leak. Although you can use soft mallet to hammer the flange into place, using the previously installed three M6x25 bolts slowly tighten the bolts in a star pattern until the flange in brought evenly into position is also acceptable. Once the flange is in position remove the 3 M6x25 bolts and replace them with the new micro-encapsulated fasteners (provided with the new IMS bearing), also apply Curil T sealant to the head of these new fasteners.
Put Curil T sealant under the head of the 12 point ARP nut, install, and torque to 10 Nm. Once the nut torque is set apply wicking green Loctite to the exposed center bearing support stud threads.

Reassemble in reverse order of disassembly.
Additional Thoughts
The best time to retrofit the IMS bearing is before you have any signs of a problem. It might be best to think of the IMS bearing as a service item where it is inspected and replaced at specified intervals or at least whenever the transmission or gearbox is removed.

This is no different than having to replace timing chains on most modern cars at set intervals. Regardless of manufacturer claims, any ball or roller bearing has a finite life and will need to be replaced. The only exception to this is the IMS Solution, which is the only permanent fix for the Porsche IMS bearing issue that once installed, needs no further servicing.
Although it is always better to replace the bearing when you are already in there, it certainly is possible to inspect the bearing and choose to leave the original one in place if it is in good condition. If the IMS flange is ever removed hold the IMS bearing stationary, then check for play at the support stud. If play can be felt the IMS bearing is worn or any debris whatsoever is found, the bearing must replaced. Additionally, with the IMS flange off, remove the front grease seal (the only one accessible) on the factory IMS bearing (you can then see the condition of the internal ball bearings). Removing the grease seal allows significantly more oil to enter and circulate through the bearing and could help improve the life of the factory installed IMS bearing. In fact, removing the grease seal on later M97 intermediate shaft bearings is recommended to improve longevity as these cannot be replaced without disassembly of the engine, as previously mentioned.

Extending the life of your Porsche engine which includes the original IMS bearing means more frequent oil changes every 5,000 miles or 6 months, whichever comes first, using Driven DT40 to maximize the protection and reduce wear. This is also the best thing you can do to help prevent cylinder bore scoring due to DT40 having a robust ZDDP and Moly friction modifier package.
If your engine is in good mechanical and running condition don’t be afraid to explore the higher RPM range of the engine. The engine and your IMS will love it and so will you. The worst thing you can do it not drive your Porsche the way Porsche intended.
Enjoy your Porsche!
Special thanks to Tony Callas and Tom Prine for the body of this content. Callas Rennsport is an IMS Solution Certified Installer located in Torrance, CA.
